Today we conclude a 3 part series – a Beginners Guide to HDR Photography by looking at Post Production of HDR Images. This series is written by James Brandon.
Check out previous parts of the series at:
Part 1: Setting Up Your Camera for HDR Shooting
Part 2: HDR From the Field to the Computer
Welcome to the third and final installment of the “Beginners Guide to HDR Photography” series. Congratulations if you’ve made it here, there has been a lot of information thus far, and this final part is going to be no different. Today we’re going to tackle the post processing beast. Post processing is where your image actually becomes an HDR. It isn’t like processing a normal photo. With a normal image, you can import it into Lightroom, fix the exposure if it’s off a bit, correct the white balance, bring in some fill light, add some detail, do some quick healing, and you’re done. One photo can take less than 30 seconds to edit if you get most of it right in camera. With HDR, you can get everything possible right in camera, and still have a steep hill in post to climb. I’ve processed HDR photos in 10 minutes, and I’ve processed HDR photos in 4 hours or more. It just depends on the image, how difficult it is, what issues it has or doesn’t have, and how quick you are in post.
In the first part of the series, we discussed everything you need to know about setting up your camera for HDR shooting. I got a few comments on why I didn’t mention how to do it from a Nikon perspective. Well, I don’t have any Nikon gear. I’ve shot Canon my whole life because Canon was the first camera I purchased. No other reason than that. Nikon is just as good (if not better) for HDR shooting than most Canon models. Since I don’t use Nikon, I can’t give advice on their camera settings. If you shoot Nikon, you may just have to do a bit of extra work to translate what I’m saying and apply it to your situation. The same goes for the software programs I’m teaching from. If you use Aperture instead of Lightroom, you will simply have to translate. If you use HDR Effects Pro instead of Photomatix, same story. If you have Photoshop Elements or Photoshop CS4 instead of CS5, same thing. There may even be features I go over that aren’t available in other programs. That’s just the nature of the beast unfortunately. I am more than happy to help in any way that I can, so don’t hesitate to ask. If I don’t know the answer, I’ll try and find someone who does. Just leave a comment below or send me a tweet (@jamesdbrandon).
What You’ll Need to Follow Along
I dug through my archives to find an image that I feel represents a situation that absolutely calls for HDR. I’ve decided that the best way to teach you how I process HDR is for you to follow along every step of the way. That’s right, I’m going to share the files with you. Just click here to download the actual RAW files from my camera that I’ll be using for this entire tutorial. Just know that these files are for practice only and cannot be used for commercial use or financial gain.
If you want to follow along exactly, there are a few programs that you will need. You don’t have to purchase them today (or ever). Just go to the companies websites and download a trial version of each software package. You will be able to use the software programs for anywhere between 15-30 days. That should give you plenty of time to mess around with each one and decide if you want to buy it or not. If you don’t have the exact programs that I use, just do your best to follow along. You may have to decode/translate a few things I say to your applications. Here’s what you’ll need…
- Adobe Lightroom – As you should know by now, this is the program I use to organize all my images and make simple edits.
- HDRsoft Photomatix Pro – This program takes your bracketed exposures from your camera and combines them into an HDR image. The software runs complex algorithms on each image, finding the best light from each bracketed exposure and combines that light on a pixel by pixel basis into one image.
- Photoshop CS5 – This is where the rubber meets the road. Photomatix only gets us a rough draft. Use Photoshop to fine tune your image and correct mistakes that may happen in Photomatix. This program can do virtually anything you set your mind to, it just requires patience and a bit of a learning curve!
- Topaz Labs Photoshop Bundle – Topaz filters give your image that extra pop that it NEEDS after being run through Photomatix. The algorithms in Photomatix have a tendency to flatten and dull the image and Topaz filters bring detail back, with a vengeance. There are several programs in the bundle, but the two I use the most are Adjust and DeNoise. Read a review of it here.
Post Processing – The Final Frontier
Alright everyone, this is it. This is where the overwhelming majority of HDR photographers produce over-saturated, haloed, noisy, over-detailed, messes of HDR imagery. Poor post processing is what gives HDR a bad name and causes people to hate HDR for how psychedelic it looks. Post is the hardest and most important part of high dynamic range photography. Are you scared yet? Don’t be, I’m going to go over my complete post processing work flow and explain how to fix and/or prevent the mistakes mentioned above. In the end, photography is about creating an image that YOU love. It doesn’t matter that there are people out there who hate HDR, I don’t create images for those people. I create them for me, and if anyone out there digs my work, great. Sometimes I see an image that calls for a more realistic and natural look, and there are other times where I want to pull out textures and details and push them past the “realistic” realm. No camera can produce an image just the way the human eye see’s it, and HDR can’t completely do that either. But it sure is closer in my opinion than blown out skies and clipped shadow areas. I wasn’t kidding when I said there was a lot of information to go over in this post. I hope you’re ready! Alright, let’s go.
Lightroom to Photomatix
In part two of this series, we learned how to get your images into Lightroom in a safe, efficient manner. The next step is to take them from Lightroom and start the HDR process with a program like Photomatix. Photomatix has been my choice from the start and I haven’t found a good enough reason to switch to something else yet. Photomatix gives me complete control over the image in a completely manual way, and that’s why I like it. For some, the learning curve of Photomatix can be steep, as it’s very easy to take an image over the top. I’ll go over ways to avoid overdoing your images and how to navigate through the sliders in this incredible program.
The first step is obviously to pick a set of brackets to process. If you’d like to follow along, import the files you downloaded into Lightroom and get ready. This set of brackets is a random image from my archives that hasn’t made it to processing yet. I chose this image because I believe it does a good job representing an image that just couldn’t be accomplished with anything besides HDR. So, go into your Lightroom collection (or wherever you keep your unprocessed images) and find the image you want to process.
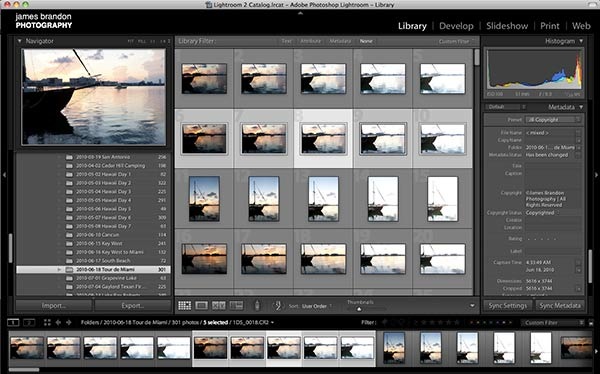
As you can see, I’ve highlighted all 5 of the images from my brackets. Go to File –> Export and wait for the dialogue box to appear. The dialogue box will go over a few basic pieces of information that it needs to determine the output of the image. It should look similar to this…
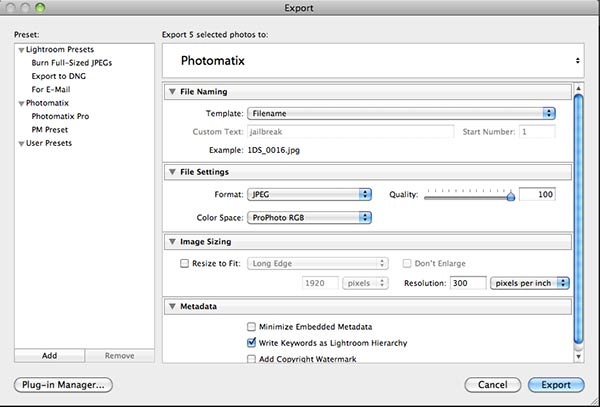
First, make sure the export option says Photomatix at the top. If you don’t have this option, you need to make sure you’ve installed the Photomatix plugin for Lightroom. This comes standard with the pro version of Photomatix. I realize there will be some debate over the next group of settings, but this is how I do it. Make sure your format is set to JPG, color space is ProPhoto RGB and quality is 100%. Then, set your resolution to 300 pixels per inch. I always start at the largest, best looking image I can produce and scale down as needed from there. JPG is a universal file format, ProPhoto RGB is the best color space by far, and 300 ppi is basically full resolution for the image. If you prefer something else, by all means go ahead. Once you have your settings configured, click “Export” and wait for the next dialogue box to open, which will look like this…
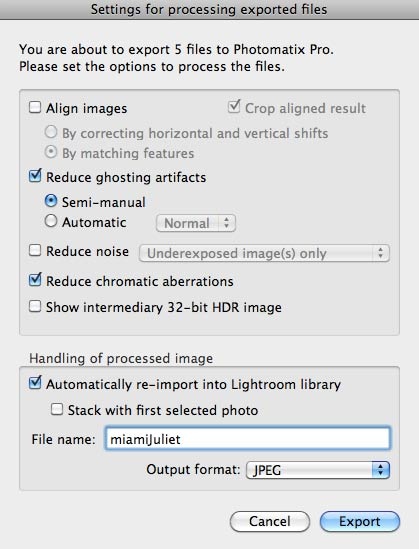
Now let’s work our way down the list:
- You only need to choose “align images” if you believe there might have been or know there was movement during your shots (i.e. if you didn’t have a tripod and hand held your brackets). If you didn’t use a tripod, I’ve found that “by matching features” usually works the best.
- With Photomatix Pro 4, you can now choose “semi-manual” for ghosting removal. I probably don’t need it in this image, but I will leave it selected just to give an example.
- For noise, I don’t worry about that until I’m in Photoshop.
- I always leave chromatic aberration reduction on.
- The 32-bit HDR image doesn’t really matter, I don’t ever select that.
- For handling I always choose to re-import into Lightroom which will place the image with the other brackets. That way, I can select the Photomatix result, as well as the other brackets, and export them to Photomatix together.
When you have all these checked, click “Export” again. Now you will be taken to the semi-manual ghosting removal dialogue. I know, there’s a lot of dialogue boxes, just bear with me…
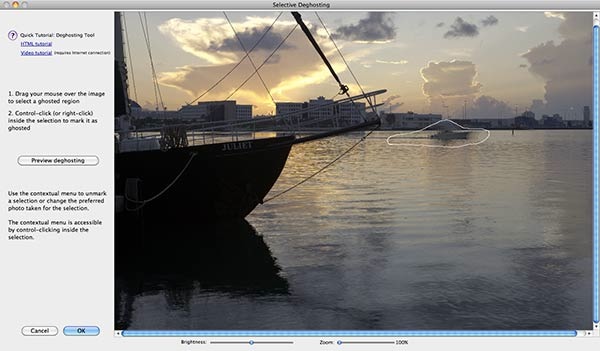
As you can see, the boat in the background is causing some ghosting issues since it was moving during the exposures. Use your mouse or pen tablet to draw a line around the boat, then right click inside of the shape and choose “mark selection as ghosted area.” Then, right click again and choose which exposure value you want Photomatix to use here in place of it’s normal algorithms. This means that instead of Photomatix blended all the exposures together here, it will only use the exposure you tell it to. You have to be careful which one you choose here and make sure the color balance around the ghosted section stays the same. I chose the “0″ exposure because I knew that one froze the boat in it’s place. Once you’ve made a selection, click “preview ghosting” on the left hand side to see if it got fixed. Once your ghosting has been fixed, click “OK” to be taken to Photomatix. We made it!!!
Now, ladies and gentlemen, welcome to Photomatix Pro 4
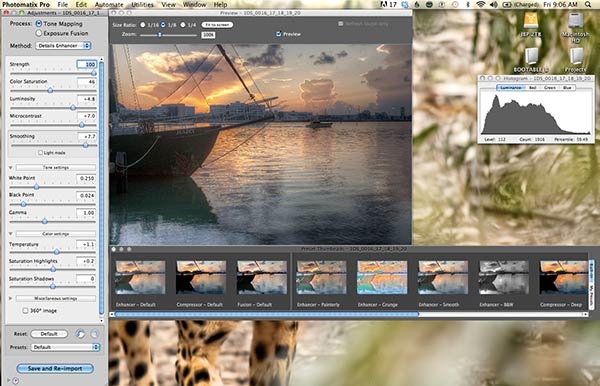
Photomatix Pro 4 is an incredibly powerful program and can also be incredibly confusing to newcomers. Have no fear, I’m not gonna just leave you hanging! No, you aren’t leaving this tutorial without becoming well versed in the art of Photomatix sliders. Not on my watch! Photomatix can be confusing because there are so many little sliders on the left hand side, and we live in a world of presets. I challenge you to throw reason to the wind and forget those presets sitting down there at the bottom. Those presets are lame, and shouldn’t be considered for use. Let’s go over the sliders from top to bottom and try to demystify each one as much as possible, while simultaneously trying to avoid making this tutorial any more of a encyclopedia sized novel. Yeah right…
- Tone Mapping vs. Exposure Fusion – Basically, tone mapping is going to produce (potentially) more surreal looking HDR images. The algorithms involved here will do everything in it’s power to produce a perfectly exposed image with a nice little “bell curve” histogram (as seen in the upper right hand side). Exposure fusion will produce more realistic looking images with much darker darks and lighter lights. The histogram will often have clipping on either side, but that’s not to say it can’t be fixed in Photoshop. For this image, we’ll go with tone mapping as it’s the most often used option. Perhaps a later tutorial for exposure fusion?
- Strength – I almost always keep it at 100%. That’s the only slider I ever max out.
- Color saturation – Here’s where it get’s dangerous. Don’t get trigger happy with this slider, it will produce terribly over saturated images that will make even your own mother cringe before gritting her teeth and saying, “That looks great honey!”
- Luminosity – This one could also be called “brightness.” The further to the right you move it, the brighter the image gets. Be careful not to make it too bright here.
- Microcontrast – My spell checker for microcontrast is notifying me that Photomatix made up a word for this one. Well done guys! This slider works in conjunction with luminosity. The further right it goes, the more contrast in the image. If you move both sliders all the way right, they almost cancel each other out. Contrast is good, too much is bad.
- Smoothing – This is the most dangerous of all the sliders. I’ve found that extreme’s, in any situation, are usually a bad idea. Moving your smoothing slider all the way to the left is a recipe for the most common mistakes made in HDR. This is where over-surreal, psychedelic, haloed messes of images are produce. As you can see, I’ve kept my smoothing almost completely down to the right. I don’t like it, and I stay away from it for the most part.
- White Point – This will make subtle alterations to the highlights of your image. Use this to tweak your histogram into submission and get rid of any clipping on the right side.
- Black Point – Same thing, but with shadows on the left side of the histogram.
- Gamma – I don’t use this one too much. Mainly because by the time I get to it, I already have the image where I want it. Moving the gamma slider to the left will make the image darker and more gritty. Moving it right will make it look terrible.
- Temperature – Use this to warm up or cool down the image. I usually just eyeball this until it looks close. I will fix white balance and temperature later.
- Saturation Highlights – Pretty self-explanatory, controls the saturation in the highlights. Keep it in the middle most of the time.
- Saturation Shadows – Same thing.
- Miscellaneous Settings – Use this section to make minor tweaks on your image if it still doesn’t look quite right.
When you have all your sliders in order, click “Save and Re-import.” Note: If you aren’t using the “re-import into Lightroom” feature, this will instead say “Click to Process.” It will process the image quickly, then you will have to go up to File –> Save As and select an image name and decide where to save it at.
Photomatix to Photoshop
Are you still with me? Listen, I know these tutorials have been lengthy. Honestly, this probably could have been like a 6 part series. But who wants to wait that much longer to get each step? There is simply no way to go over this much information in a less wordy approach. There is a lot to cover with HDR, so bear with me, we’re getting there!
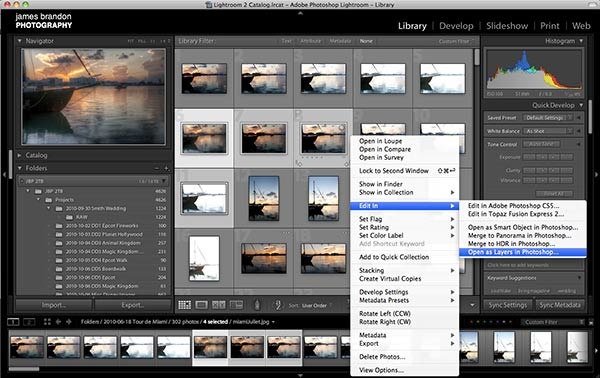
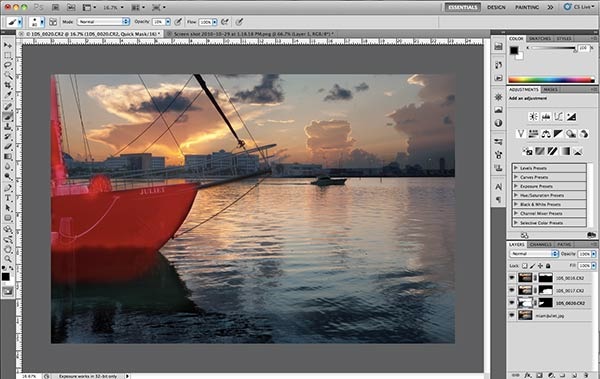
Now that you have your Photomatix result, it’s time to take everything into Photoshop. You may wonder why I like to re-import my Photomatix result back into Lightroom. Well, there is no other reason besides the next step; getting everything into Photoshop in one, tightly packaged photoshop file. The Photomatix result should re-import into Lightroom right next to the brackets that you exported. Now remember, Photomatix only gives us a rough draft of our final image. We need to go into Photoshop prepared to fix some of the mistakes caused by Photomatix. The best way to fix these mistakes is by going to the source files. You don’t necessarily need to bring them all with you, just select ones. In an image like this, I want to bring in a source file for the sky, one for the boat, and one for the water. Then, I’ll use masking in Photoshop to bring in key parts from each source file into the final image. In Lightroom, hold down Command on a mac (control on PC) and click each image you want to use, including the newly imported Photomatix result. Once all images are highlighted, right click and choose Edit In –> Open as layers in Photoshop. That will send everything to Photoshop in one pass and even layer each image so you don’t have to bring in each one individually.
Now (for me at least), it’s time to close Lightroom. LR is really bad about hogging CPU space, and I want Photoshop to run as smoothly as possible. A quick disclaimer about Photoshop: There is probably 10 different ways to do any 1 thing in Photoshop. If I do something differently than what you have learned or were taught, don’t feel like you have to do it my way. I am simply sharing how I do things and you can take it or leave it. Once you’re in Photoshop, make sure that your Photomatix result is on the bottom layer. If it’s not, simply click and drag to the bottom. Some HDR photographers will tell you to put the Photomatix result on the top, so you can mask through to the layer beneath, merge the layers together, and then repeat for the next layer. While that will certainly work, I disagree with this practice. When you process the image that way, there is no turning back once you start merging layers together. If you process an image right in Photoshop, you should always have a way to undo something, no matter how far back in the process it was. With that said, I place the Photomatix result on the bottom, then turn off all the layers above it except for the one I’m using at the time. So, for the source file that you’re currently masking in, place a black mask over the image, get out your brush by pressing (B), make sure that you are painting with white (x will make your color pallet black and white, then hit x until white is on top) and begin painting through the mask to reveal the layer beneath it.
- What is masking? – Well, masking is really one of the most powerful tools in Photoshop. Masking allows you to select certain parts of a layer to show up, while hiding other parts of that same layer. It’s a way of erasing parts of a layer without permanently erasing them. If you place a white mask over a layer, everything on that layer will still show up, nothing will disappear. If you begin painting on that layer mask with a black brush, every stroke you make will hide that part of the layer, revealing anything beneath that layer. On the flip side, if you place a black mask over the image (by holding “option” or “alt” when clicking the mask button) you will cover up the entire layer and fully reveal the layer beneath it. When you paint on that black mask with a white brush, every stroke made will reveal the layer with a mask over it. A good way to remember masking is to this: Black conceals while White reveals.

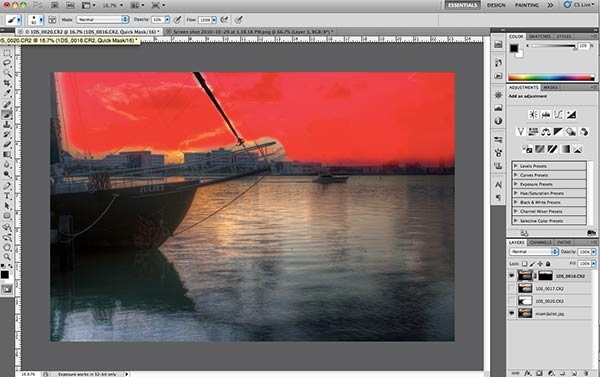
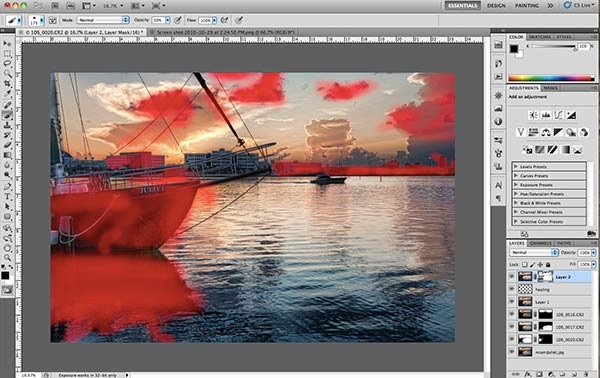
The top layer in this case is the source file with the best sky. What you want to do is find the parts of the sky that Photomatix over processed. In most cases, this will be apparent when you have black or very dark clouds next to perfectly blue skies. In this instance, it’s a little more tricky. Photomatix didn’t do anything terrible to this sky, but there are very subtle mistakes present. There is slight haloing around the lines coming down to the boat. There is also an unnatural color shift apparent in the sky. You may not even be able to see this, but when you paint through to reveal the source files sky, you’ll see what I’m talking about. The subtle changes are what can make or break a great image, so don’t get lazy here. Here’s a red overlay of the mask I painted to reveal the sky from the top layer source file. It didn’t need to be an exact or precise mask in this case.
Now that we are done with that top file (the sky), it’s time to move to the next layer, which in this case is the file I brought in for the water. This mask also doesn’t need to be super precise. I just want to paint in a bit of the source file so that the water looks nice and crisp. The Photomatix result tried to mask in all the different exposures for the water, so there is some ghosting present in the water. Sometimes, the ghosting adds a nice effect and feeling of movement to the water. For this image, that’s not what I’m looking for, I want to freeze the water in it’s place. To do this, just repeat the last step on the next layer down. Here’s what my next mask looks like…
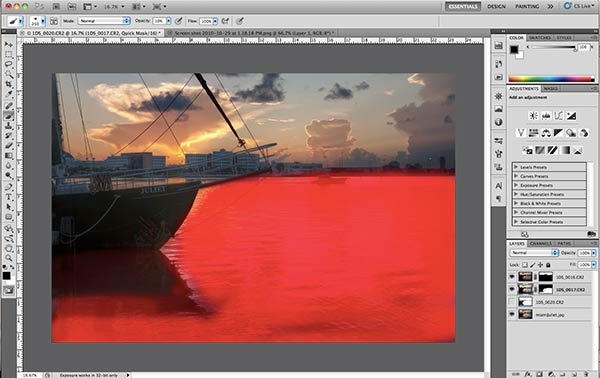
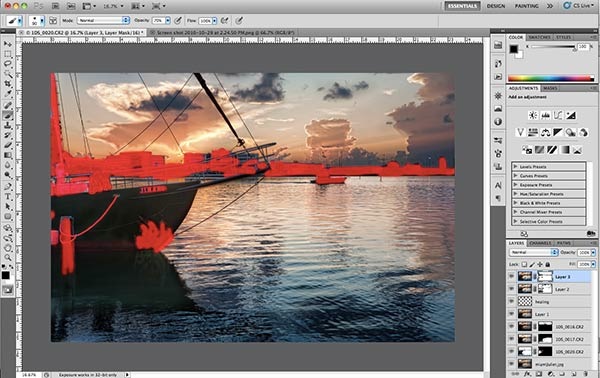
Notice that some shades of red are darker than others. This is because I paint with different brush opacity’s for different parts of the image. To change the opacity of a brush, just hit a number key. With your brush selected, just hit 5 for 50%, 9 for 90%, 2 for 20% and so on. If you want 56%, just hit 5 and 6 really fast. Also note that the edges of the brush I’m using are very soft and feathered. You can change the hardness of the brush by clicking the brush size in the upper left hand corner. Now it’s time to move to the last layer, the source file for the boat. Here’s my mask for the boat…
Ok, I can see the light, we’re almost there! By now, some of you may be wondering what’s the point of even using the Photomatix result at all? After all, it looks like I just blended in the majority of the image from the source files. Well, not every image is the same. This image called for more information from the source files than others. First off, I didn’t use 100% opacity on any of the brush strokes on any of the layers. Therefore, there has to be a backdrop for these masks to fall through to wherever there is black in the masks. That backdrop is the Photomatix file. Some images I use 90% of the Photomatix file and just 10% from source files, it just depends.
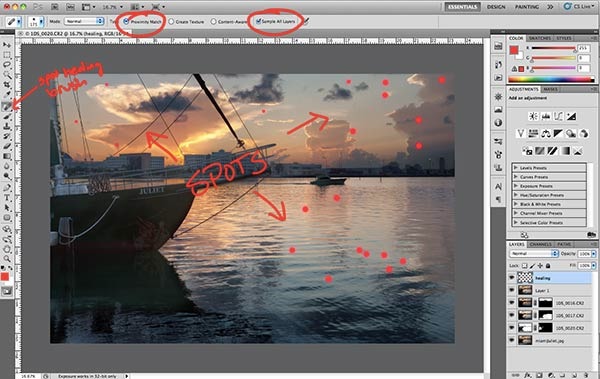
One of the last steps now is to remove dust spots and distractions from the image. At this point, it’s a good idea to go ahead and combine all the layers into one. That doesn’t mean we will lose the layers we already have. We aren’t merging the layers together. We are creating a new layer at the top with all the information from the layers we’ve worked on. To do this, with the top layer selected, hold and press Shift –> Option (alt on PC) –> Command (control on PC) –> E. That will combine all the layers into one image at the top. Now we need to create a new, blank layer to remove the spots. Whenever you create a new layer, Photoshop will place that layer above whichever layer is currently selected. Therefore, select the top layer (top layer has presedence over all the others), hold down and press Shift –> Command (control on PC) –> N to create a new, blank layer. If you want to title the layer, title it “healing” or “spots” or something like that. With the new blank layer selected, grab your Spot Healing brush from the toolbar or hit (J). Make sure “Sample All Layers” and “Proximity Match” are selected at the top. Sample All Layers means that the brush will look at all the layers beneath to decide how it will cover up the spot showing on the screen. Proximity Match means that it will sample pixels from around the spot to fill it in. If you’re on CS5, I wouldn’t suggest clicking the Content Aware radio button for spot removal. For some reason, and I don’t know why, the content aware option just doesn’t work very well for removing dust spots. Ok, here’s a screen shot for the spot removal…
Now that our spots are gone, we can finish up the image with Topaz Adjust. Go ahead and combine the healing layer with the others so Topaz has a single image to work with. Again, hold and press Shift –> Option (alt) –> Command (control) –E. Now make sure that combined layer is selected at the top and get ready for some Topaz magic!
Photoshop to Topaz
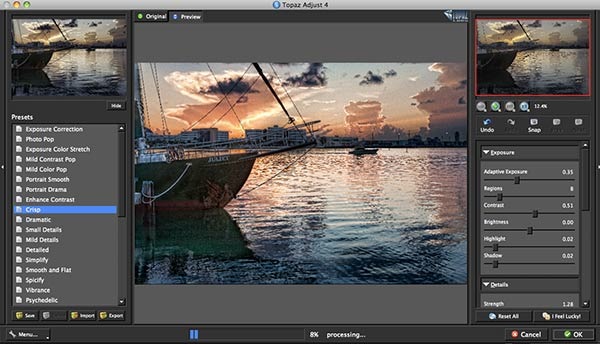
Here’s where the image comes alive with detail, clarity, and pop. With your newly combined layer selected, go to your Filter’s menu and select Topaz Labs –> Topaz Adjust. If you don’t have these in your filter menu, make sure you followed the installation directions correctly from Topaz Labs. Once inside Topaz Adjust, you will be greeted with a smorgasbord of tasty, delightful and tempting filters to choose from. Have fun with all the different option, but be careful because some can take a great image and destroy it with taboo HDRness. One of the filters I use most often is the “Crisp” filter. It doesn’t do much in the way of crazy to the image besides adding some pop to it. Just select the filter you want to use, then click OK.
Topaz Adjust did what it was meant to do; i.e. it added pop to the image by creating detail and texture throughout the image. One thing you want to learn to avoid is applying filters like this globally to the entire image. When there is too much detail and saturation over the entire image, the viewers eyes can become strained by taking so much in. What you want to do is pull back in some areas and use that texture and detail to guide the viewers eyes where you want them to go. Place a white mask over the Topaz filtered layer and paint through the mask with black on the areas where Topaz went overboard. For my taste, I painted through the darker clouds because Topaz took them and made them almost pure black. Black clouds are a big no-no in HDR processing, stay away from them. Topaz also added a bit too much detail in the boat, so I masked through that a bit too. Here’s what my mask looked like…
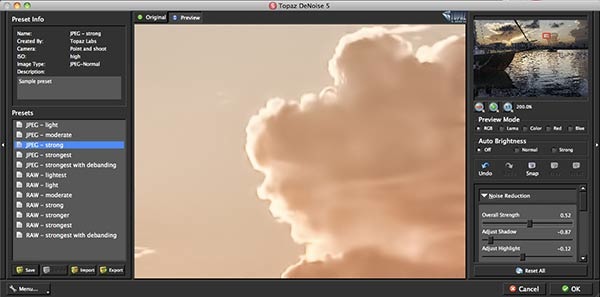
One of the downsides to these filters is that it will introduce a bunch of noise into the resulting image. For that, you will need Topaz DeNoise or a similar noise reduction product. Create a new combined layer to add DeNoise to by doing that infamously long short cut, Shift –> Option (alt) –> Command (control) –> E. Then, go to Filters –> Topaz Labs –> Topaz DeNoise to get started. Once inside, you’ll find that DeNoise looks much the same as Adjust does, but with fewer options. The sky is one of the most prevelant parts of an image to get noisy, so I like to zoom in on the sky to see the noise. From there, just select a noise filter that removes the noise from the image. It’s a good practice to start low and work your way up to the stronger filters. You want to get by with the lowest amount possible because the higher you go, the more detail you will lose. For this image, I chose the “strong” filter and adjusted the strength a bit on the right hand side. Once your done, click OK.
DeNoise is no different from Topaz in that you don’t want to apply the filter globally. Any noise reduction filter is going to reduce detail to some extent, so you want to take care and remove the filter from certain parts of the image. Noise reduction filters can be harmful to things like text, far away objects, and close up details. Just like before, add a white mask to the DeNoise layer and mask through where you don’t want the DeNoise filter to be present. Here’s what my mask looks like…
When you’re finished here, that’s pretty much it. There may be some minor tweaking to be done here and there, but that’s no big deal. From here, all you have to do is save the file out as a JPG and have fun with it. If you’ve made it through the entire tutorial and used these source files to produce an HDR, why keep it to yourself!? I’ve set up a group on Flickr to upload your result and share it with the readers here at DPS. Just upload your finished image to your free or Pro level Flickr account, then go to the DPS Guide to HDR Photography Group and add your image to the pool. I’ll do my best to review each image and give constructive feedback on the processing. I’ll also include my full size image for reference.
Conclusion
Oh. My. Goodness! If that wasn’t the most complete online tutorial for HDR, I don’t know what is! This section has been exceptionally long, I know, but there was simply no way around it. HDR is a very labor intensive process that requires patience, a bit of a learning curve, and a whole lot a love. I’m sure there will be many many questions regarding certain parts of this tutorial, so don’t hesitate to ask by leaving a comment below or by sending me a tweet (@jamesdbrandon). I’ll do my best to answer each question as quickly as possible. Thank you to everyone who has stuck through this tutorial since part 1 and for all the comments and questions I’ve received thus far. This 3 part series has been an absolute blast and I am incredible thankful to Darren Rowse of Digital Photography School for having me as a guest contributor. I hope this tutorial has been helpful to those who want to learn this sometimes controversial form of photography. If you want more, let me know what topics you think I missed or require more information, I’m always open to suggestions. Thanks again and happy shooting! ![]()
The Final Image

See more from James Brandon at James Brandon Photography and follow him on Twitter at @jamesdbrandon.
Post from: Digital Photography School


Nenhum comentário:
Postar um comentário