sábado, 4 de junho de 2011

Trap Your Friends in a Jar Using Photoshop

Trap Your Friends in a Jar Using Photoshop: "

Advertise here

Have you ever had a friend who was so great that you wanted to put them in a jar and save them for later? Ok, that might not be possible and may be a bit creepy but in Photoshop you can do anything right? In this tutorial we will learn how to take photos of your friends and place them into jars. This tutorial is a lot of fun and is something that you can do with practically any digital camera and Photoshop. Let’s get started!


Tutorial Assets


The following assets were used during the production of this tutorial.


Step 1 – Take Your Photographs


The great part about finding subjects for your composition is that you don’t have to look too far, grab some of your old photos of your friends if you like or take some when your hanging out because in this tutorial you don’t need a fancy camera and a tripod!


As with a lot of subject images, they don’t always have the light source we want for applying them straight away into the base image – so what I will show you later in the tutorial is how to blend these images to look more realistic in your final composition.


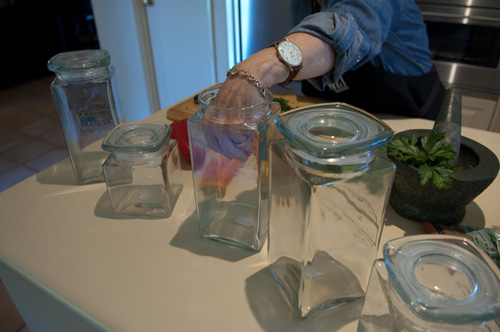
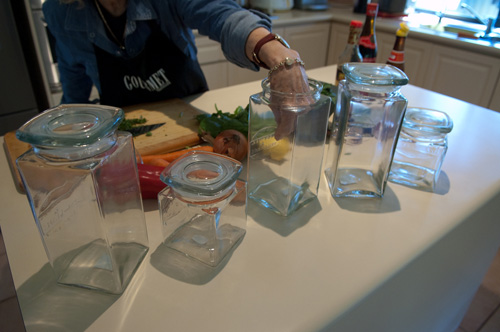
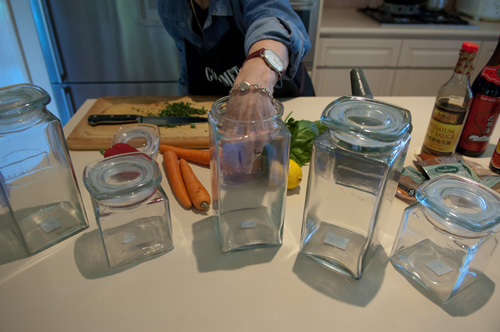
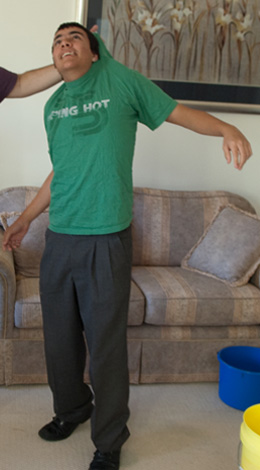
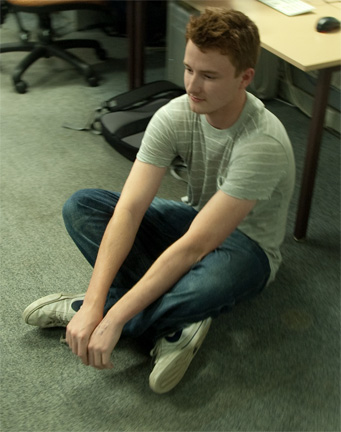
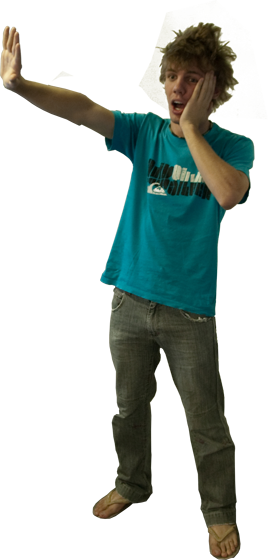
The first thing you need to do is think about what you want to create. It is a lot easier to create your composition if you know what your general concept will be. The second thing you’ll want to do is take as many pictures as possible so you have a bigger range to experiment with – that way it is more likely you will get the correct angle when applying your subject into the image. In my case I took around 10 photos at different angles for the base and around 5 for each of the boys.(however for simplicity purposes I will only show a few examples)


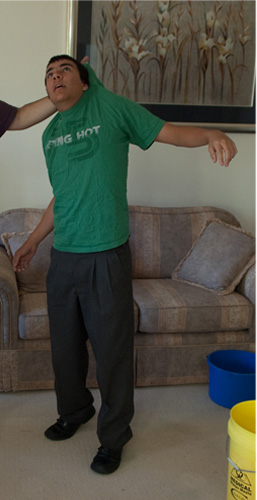
If you are using photos already taken, try and find ones that will suit. The main thing to worry about is placement; you want to have your subject in a position that looks more realistic for your composition. For example if you want to create something like I have done using your own friends, make sure you have full body shots and not cut off at the torso. You’ll notice in the photographs I took, I had a general idea of what I wanted to make and I wasn’t concerned with light or the environment they were in. Try and be creative with it!


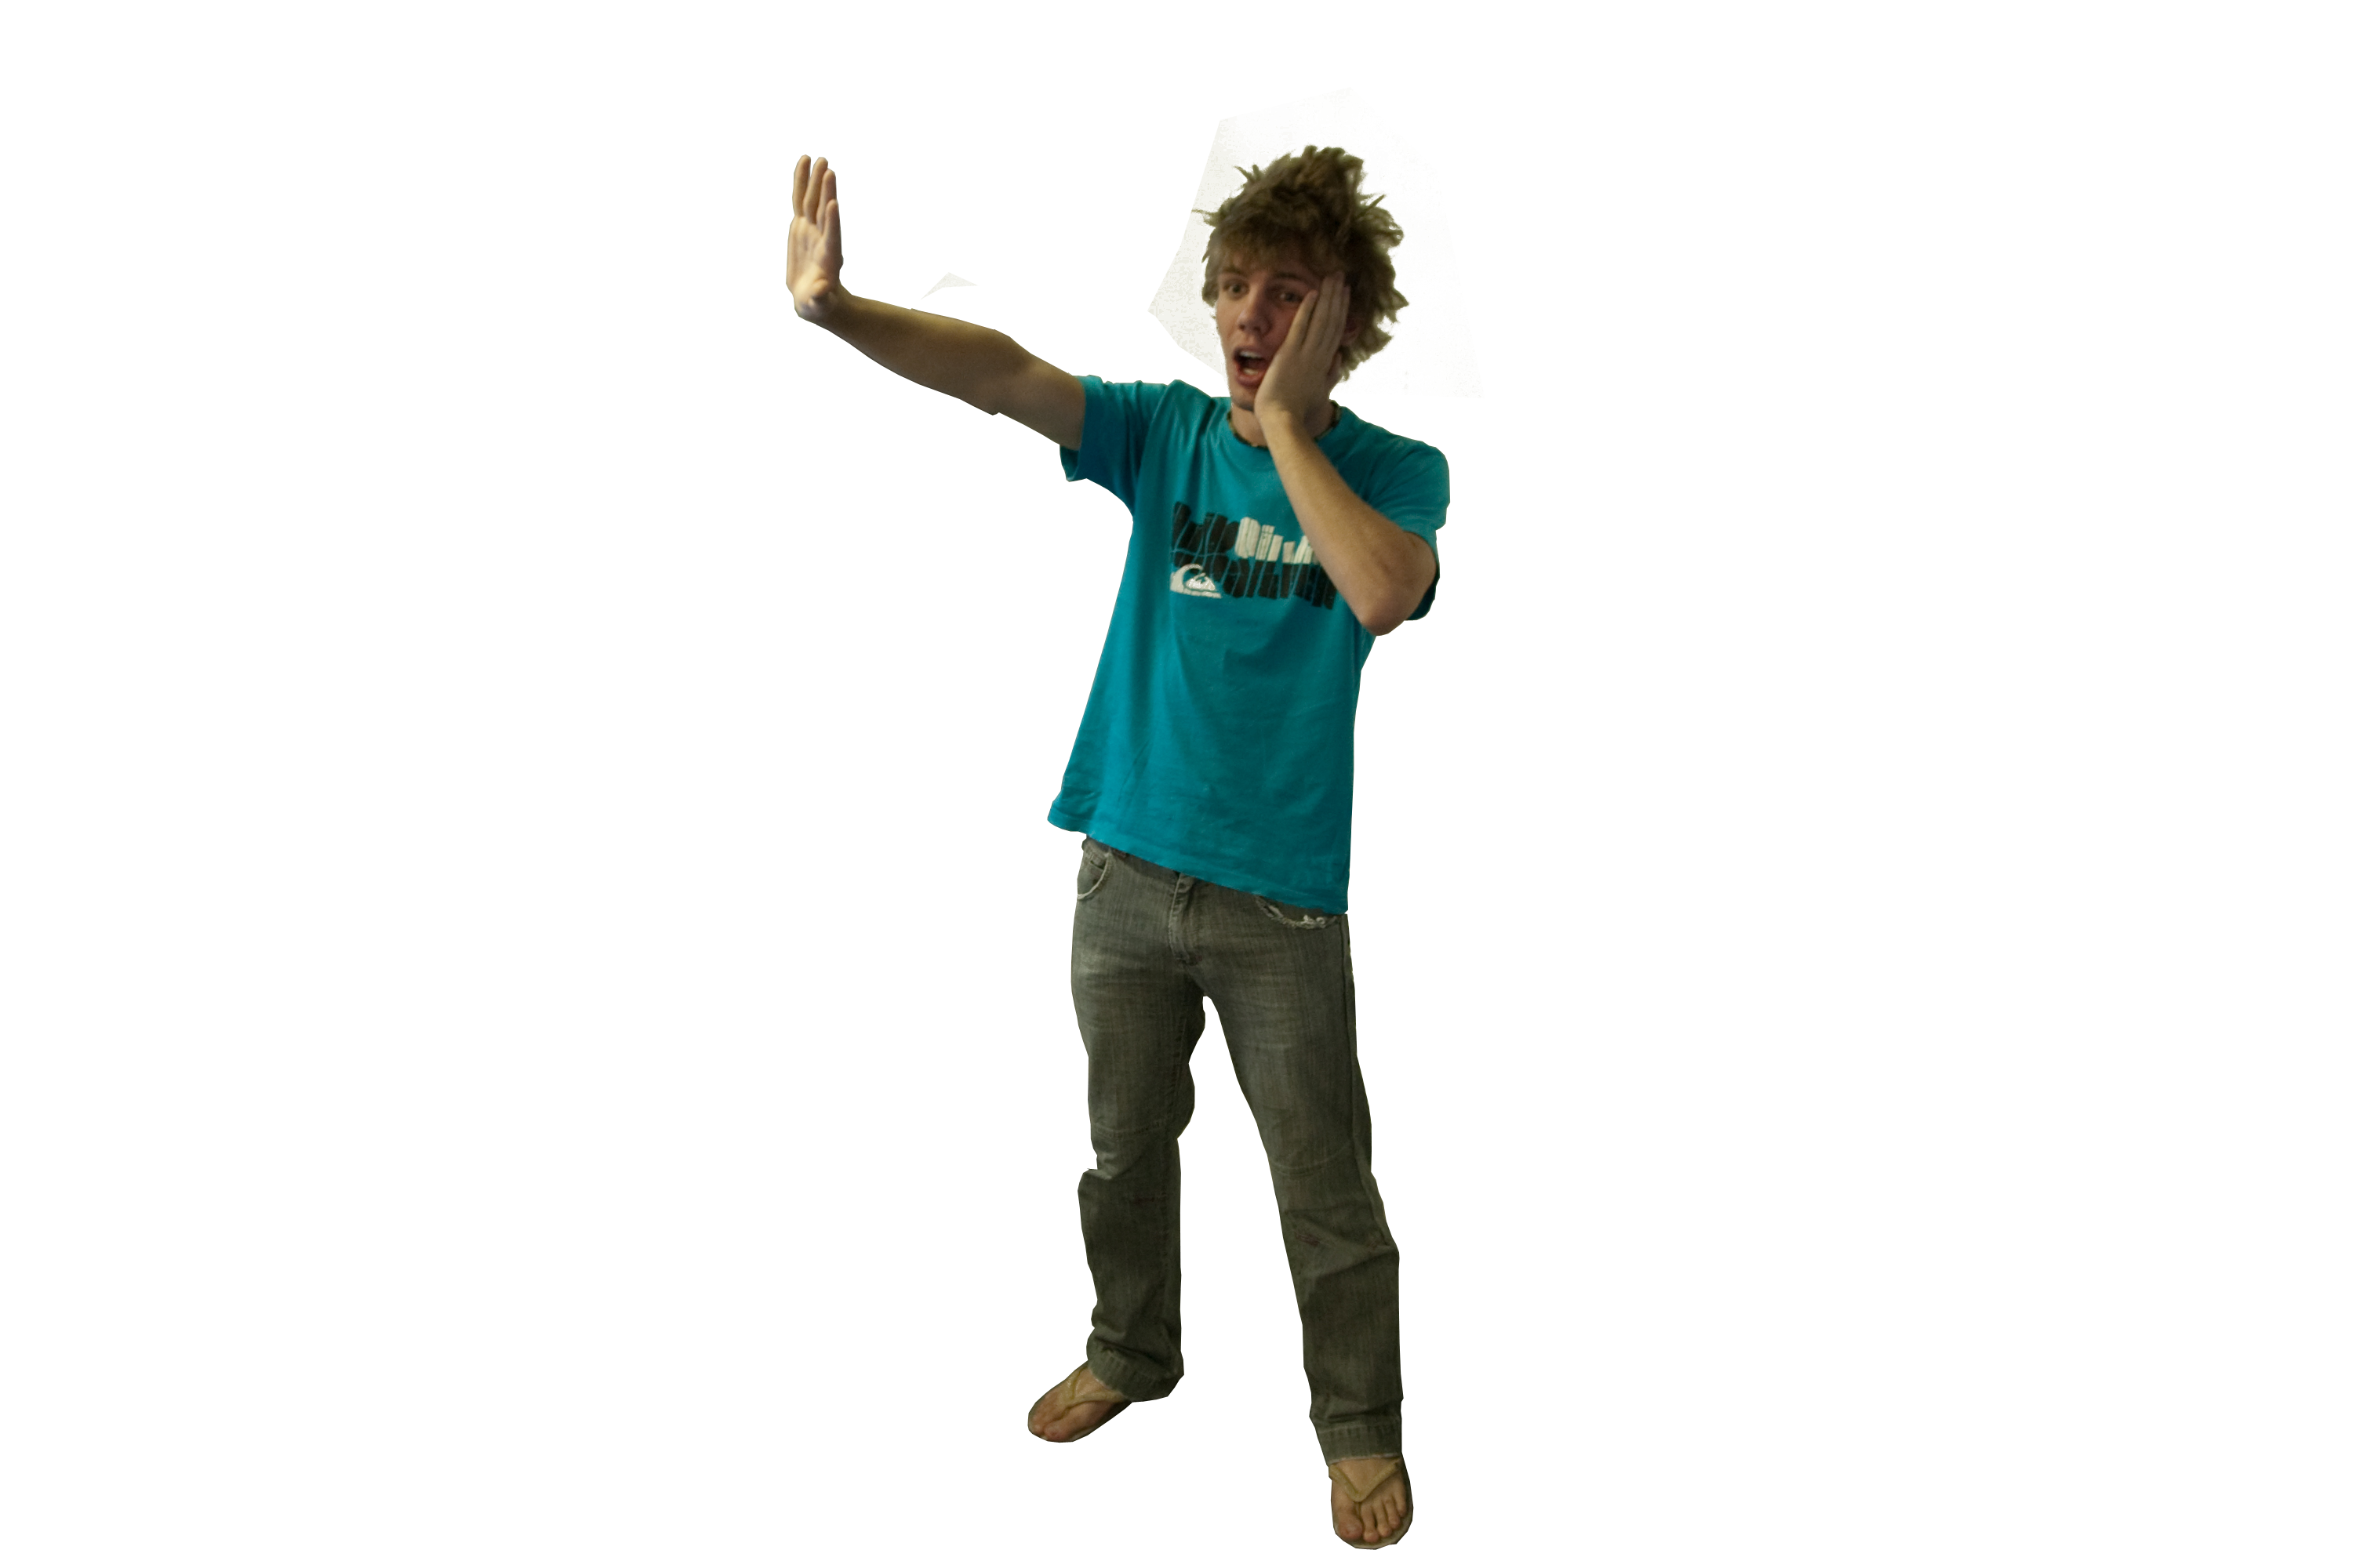
Step 2 – Extract Your Images


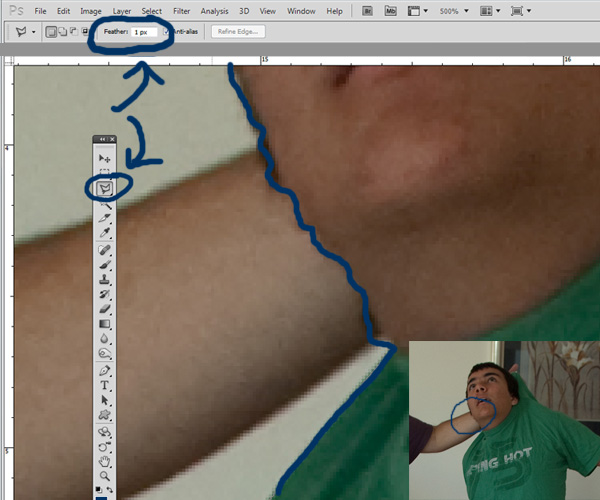
The next step is to extract your images. The best way to extract is to use your RAW or high quality image and zoom in about 500%. This way you get the best accuracy you can while cropping and when it comes to sizing/positioning your subject the quality is going to be at its peak.


I crop my images with the polygon lasso tool, using a 1px feather and paste it on a new layer. Using a feather leaves the pasted selection without jagged edges. You can repeat this process for however many people you would like to be in your work.


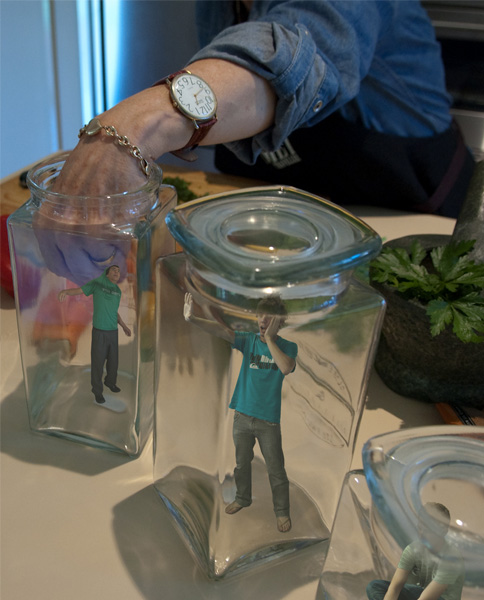
Step 3 – Position Your Images


Now place the extracted images as shown below.


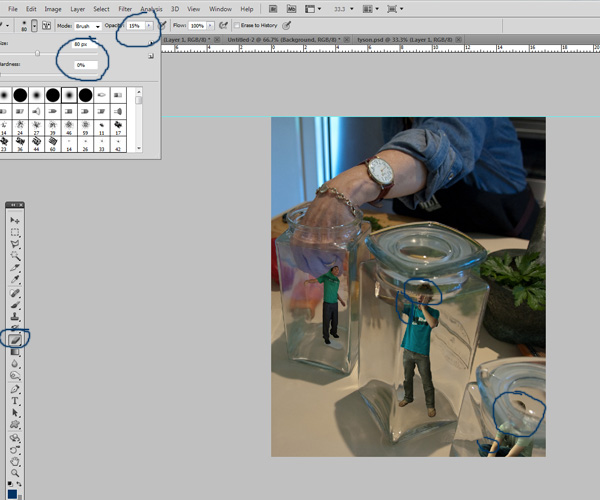
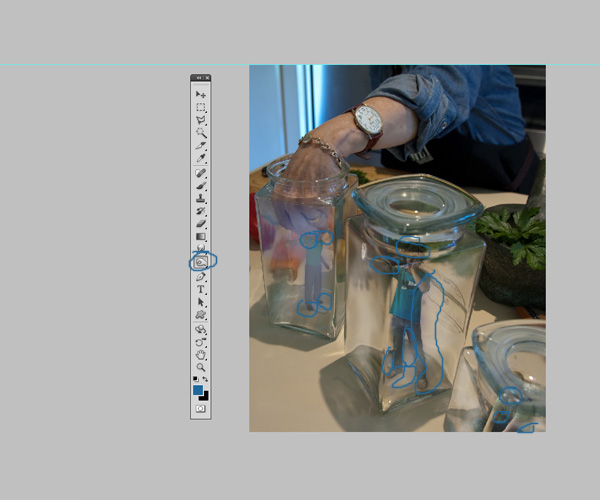
Step 4 – Distorting Your Subjects


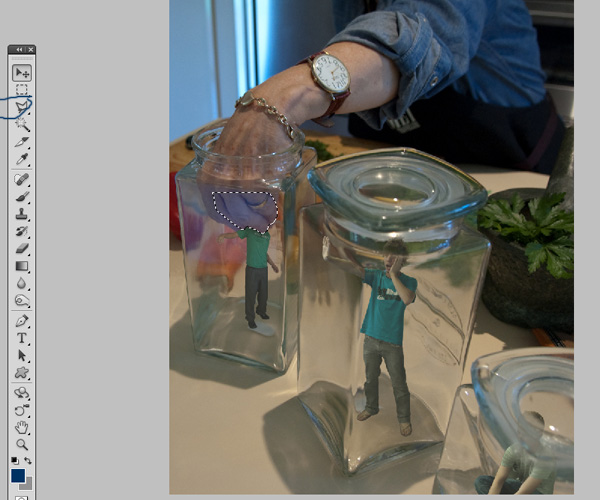
We now want to edit our subjects. Grab a small brush with low opacity, and gently brush away parts of their body which would -in reality- be obscured by the thick parts of the glass. This is the beginning of the illusion that they are in the glass.


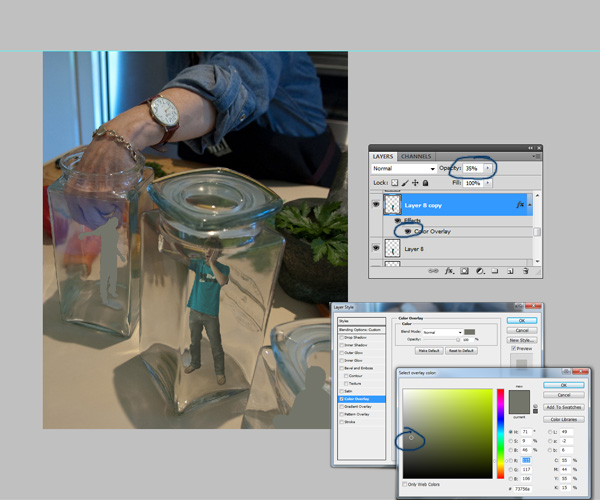
Step 5 – Creating Subject Layers


If you have ever noticed when you look through glass it is not 100% see through. So what we are going to do is add a slight tint to the subjects so they are not as clear. To do this duplicate (Command/Ctrl + J) your subject layer and give them a colour overlay of grey, I used #73756A. Do this to all of your subjects and then decrease the opacity of each to around 35% or your best judgment.


Optional: Duplicate your subject layer, and add a slight Gaussian blur (Filter > Blur > Gaussian Blur) and lower the opacity to about 15%.


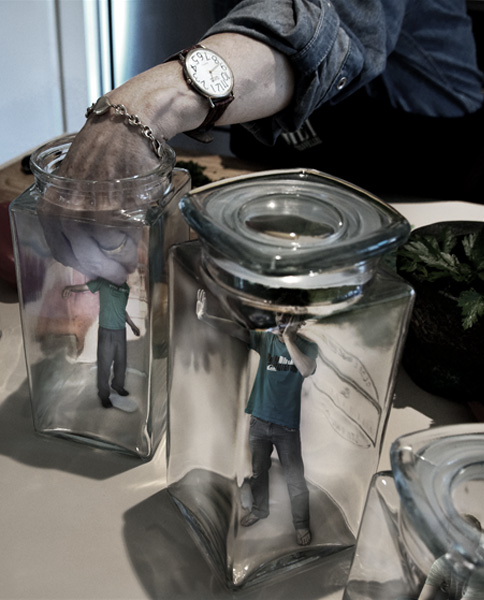
Step 6 – One Jar at a Time


Starting with jar one, we want to get the hand to hold the subject. There are various ways one can attempt this, my way is making a selection (just like Step 2) of the hand, and the pasting that above the subject layer, however using a layer mask on the subject itself would be just as effective. It just depends what you are used to.


Step 7 – Distorting Your Subjects


We are now going to want to go through each jar and finish making the subject look like it’s inside it. In my case, I added a slight grey/blue overlay (using a soft brush) to the subject so the light matched better. This is an optional step, as it might differ depending on the work your doing. If you need to match light on the subject better, a nice technique is to take the eyedropper and take a sample of the light colour on the main image. From there, use a soft brush with low opacity with that colour and brush over the subject. You can then chose to overlay/multiply this coloured layer until you have the desired effect. Another option is to duplicate your subject and then bring up hue/saturation adjustments (Command/Ctrl + U), hit colourize and set it to the colour of the light. Then using a layer mode of your choice (usually overlay) with a lower opacity.


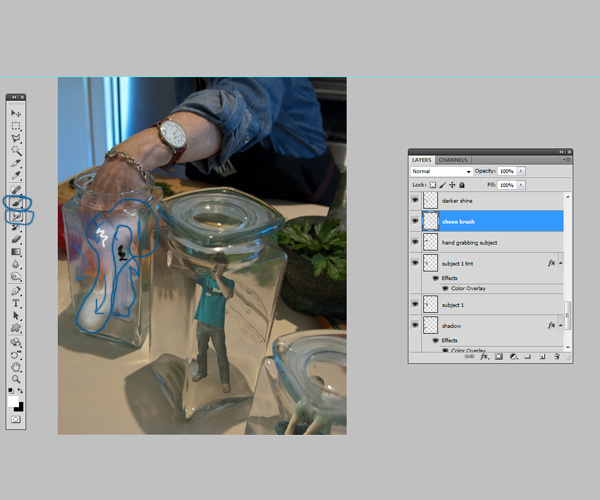
From there, to create that ‘trapped’ look, we are going to create a fake shine. To do this, grab a large soft brush at about 30% opacity and do a quick diagonal brush on the jar. This is the tricky part. What you’re going to want to do is get the smudge tool, and smudge the white brush to go along with the contours of the jar. For example: Do not put the white brush on corners, because glass doesn’t shine the same on the corner. Once you have properly smudged the brush, put the opacity down to whatever looks good for you, in my case it was 33%


Optional: Grab a soft brush eraser at 10% opacity and erase some bits of the white so you get slightly more depth


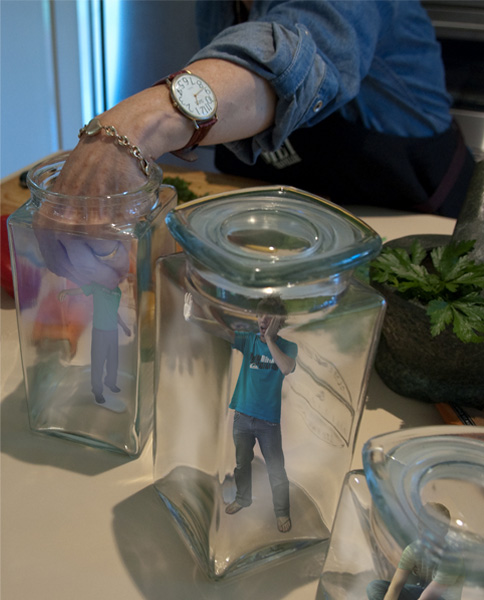
The last thing we need to do is add a slight shadow to the subject. Now on my image we can see that the light is coming from around the top right area, judging by the shadows of the jars. So from here the best way to create a shadow is to copy the subject layer, and using blending options like Step 5, fill it with black. From here go to Filter > Blur > Gaussian Blur and you will want to blur the shadow enough so that its fuzzy, yet you can still make out the figure. (I won’t post a number because it’s different in every case). From there using the transform tool (Command/Ctrl + T), transform it so it fits in with the other shadows. Then lower the opacity until satisfied. (Mine was 20%)


We can then use this same technique, and apply it to the other two jars.


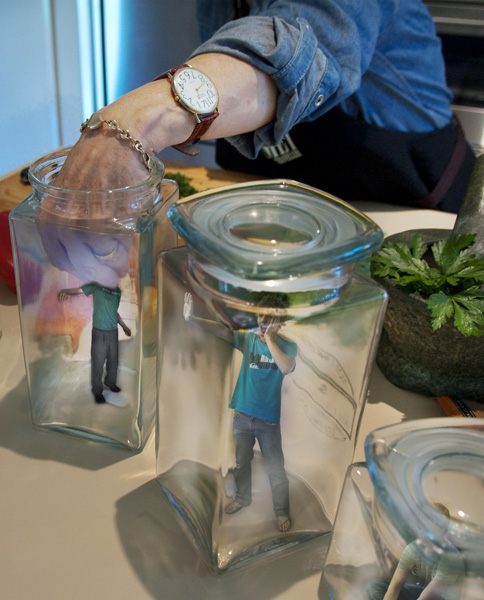
Step 8 – Finishing Touches to your Subjects


We are now ready to add some finishing touches to our subjects and the areas around our subjects. Grab the burn and dodge tool, and go around your subjects where there would be darker areas. In this case because our subjects are confined by an object there would be slightly darker areas around their body. You don’t need to get every single area however in my case the main areas were: The hand grabbing the head, the hand pressing against the glass, needed more light. (as an option you could also grab the liquify tool and expand the skin slightly for extra realism), foot shadows and areas where thick glass is on top of the subject.


Secondly, I used some soft black/white brushes in spots around my composition set on overlay so I could increase the effect of the light source and increase the effect of my fake shine.


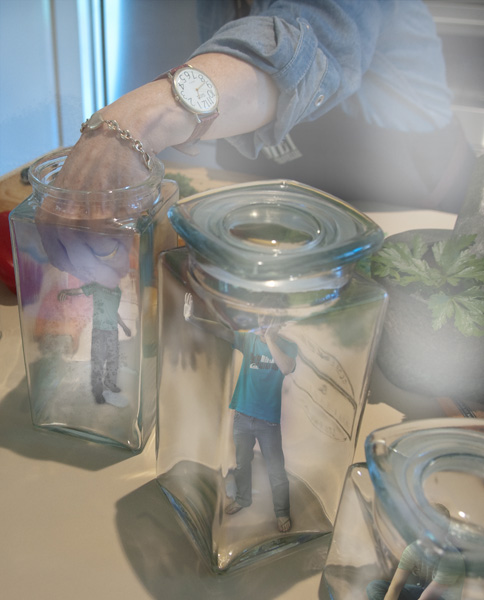
Step 9 – Finishing Touches


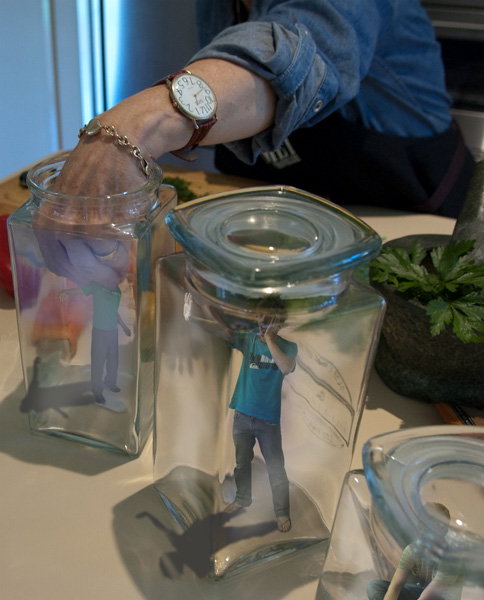
Now I know what you are saying, " it hasn’t really blended that well". Well this is my favourite part because with this technique, it can blend your colours, light, and subjects all together nicely while still creating a unique style of photo manipulation.


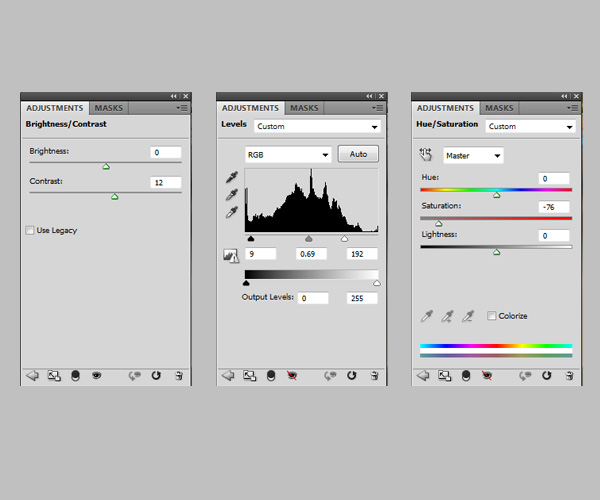
Using Layer > New Adjustment Layer > Hue/Saturation. Layer > New Adjustment Layer > Levels. Layer > New Adjustment Layer > Brightness/Contrast


Levels – Using levels will enable you to make a really strong composition. Levels will enhance your fake shine, general contrast and really make those jars the focal point of your composition.


Hue/Saturation – As levels will generally create a high contrast of colours, slightly de-saturating the colours calms everything back down. It allows colour to be shown without having that harsh contrast of varying colour.


Brightness/Contrast – Just used as a failsafe and to be used to tweak slightly more if needs be.


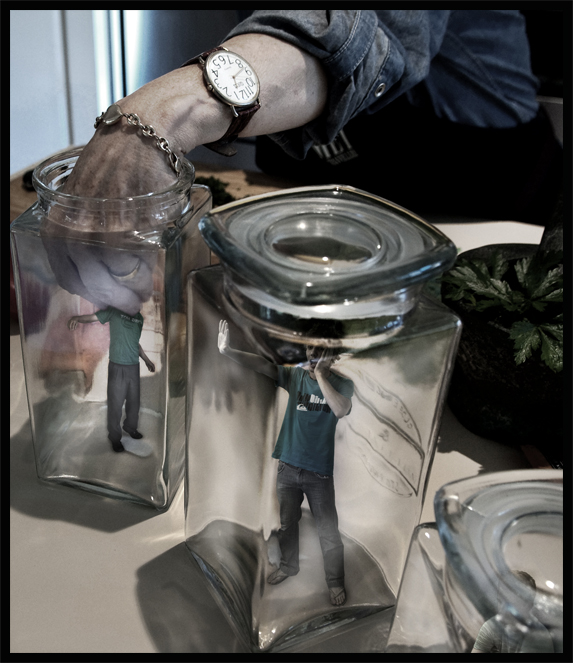
These three adjustments are entirely up to you and how you want your final piece to look If you want to experiment, you can use Curves and Colour balances as well. Finish off your composition by adding a thick black stroke.
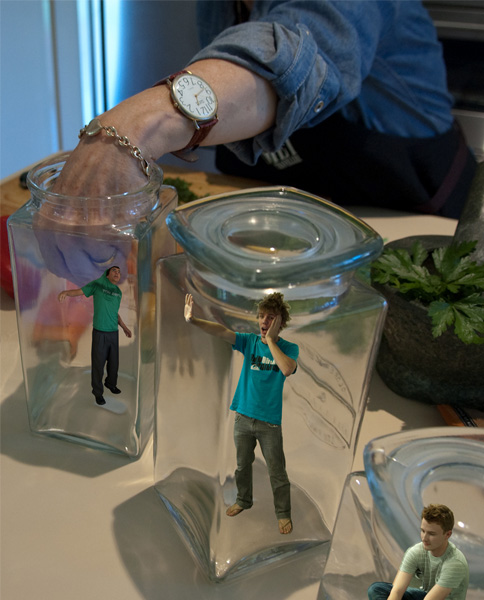


Final Image


"

The World of 100

The World of 100: "

There is no doubting the skill of designer Toby Ng. His designs have won him numerous accolades including the Red Dots Awards, International Design Awards, and the Hong Kong International Poster Triennial Awards among others. One of his projects, called World of 100 answers the question: If the world were a village of 100 people, what would its composition be? The answer consists of twenty brilliantly designed posters based on statistics about the population around the world under different classifications. The stats are more powerful because of Ng's illustrations. He uses vibrant, bold colors combined with crisp, clean lines.


“Look,” says Ng, “this is the world we are living in.”


Toby Ng's website

via [Brain Pickings]"

The ascendance of App Inventor

The ascendance of App Inventor: "

App Inventor logoGoogle's App Inventor began as an educational tool to teach people fundamental programming concepts by helping them easily create simple Android apps. But the response — many were excited by the idea of making an app without needing much programming knowledge — turned App Inventor into something more. The App Inventor development team realized they had gained a new audience of hobbyists and creators, and so subsequent App Inventor updates have transformed it from a "toy" educational system into a more robust tool that lets you build more complex Android apps.


David Wolber (@wolberd), a professor at the University of San Francisco, has been teaching students how to use App Inventor. Based on his course materials, he co-authored the book 'App Inventor.' He also provides feedback and suggestions on the continuing development of the App Inventor kit to the project's lead, Mark Friedman, and creator, Hal Abelson (who is also a co-author of the 'App Inventor' book).


In the following interview, Wolber discusses App Inventor's evolution and its applications.


What are App Inventor's major strengths and weaknesses, technically speaking?


David WolberDavid Wolber: I've taught beginning programming for years and there are a lot of smart, creative students who get bogged down with the syntax and cryptic error messages you get when you type in code. They come to computer science excited about technology and immediately face these weird, frustrating mechanics.


With App Inventor, beginners can build really cool apps within hours. Instead of typing code, you plug puzzle pieces together. They only fit together if they're supposed to. Instead of remembering and typing commands, you choose from the high-level functions (puzzle pieces) provided. And your first programs aren't printing "hello world" on the screen — they're reading the GPS sensor or sending a text to a group of friends.


App Inventor includes high-level function blocks, but there are also all the programming constructs you find in a textual language: if statements, while loops, etc. There aren't blocks for every conceivable Android function, so there are some limitations, but the limitations aren't inherent and the App Inventor team adds new blocks all the time.


For some time in the past only highly technical people could set up blogs and wikis. Then tools like WordPress, Blogger and Google Sites transformed things so that anyone could create a blog or wiki. I see App Inventor doing the same thing — it's going to allow all types of people, not just the techies — to create apps for this incredible new mobile world.


If I weren't so busy teaching, I'd start a prototyping and mobile app company based on App Inventor right now. The company would take in ideas and use App Inventor to turn them into interactive, working prototypes within hours. App Inventor is that good, and turn-around time is that fast. I wouldn't be restricted to hiring only experienced, expert programmers.


What's the most common mistake people make when using App Inventor for the first time?


David Wolber: Probably the most common mistake that beginning programmers make, with any language, is to have long coding cycles without testing. I'll see a student with 30 or 40 App Inventor blocks in their app and I'll ask them, 'How's it going? Does it work?' and they'll answer, 'I think, but I haven't tried it.' Even with App Inventor, this 'big bang' approach is a strategy that leads to big bugs.


The book addresses software engineering principles: testing your app early and often being a key one. The great thing is that App Inventor provides fantastic tools for doing this — you can plug your phone into your computer and literally test your app as you build it.


App Inventor — Learn the basics of App Inventor with step-by-step instructions for more than a dozen fun projects, such as creating location-aware apps, data storage, and apps that include decision-making logic.


How much of a gap is there between the skills acquired through App Inventor and the skills needed to develop apps professionally?


David Wolber: With App Inventor you'll learn the key programming concepts — conditionals, iteration, functions, parameters, etc. — just without some of the headaches of a text-based language.


I've had a number of students transition from my App Inventor course to a course based on Python and they've thrived. It helps to have a firm basis on the concepts, and because they've had success and built some cool apps with App Inventor, they're motivated and ready to tackle programming with a text-based language.


App Inventor also provides an introduction to the Android operating system. You're not going to learn the same exact commands that are available with the Android SDK, but you'll get a feel for how things work, which will help if you do progress to that level.


If you're already an experienced programmer, you should know that App Inventor won't really help you learn the Android SDK. App Inventor doesn't yet generate code, so you can't go to the SDK level if you reach a limitation.


Having said that, I encourage established programmers to learn App Inventor. It's a great tool to have in your arsenal, especially if you believe in user-centered design and getting feedback early in the development process. There is simply no faster way of creating a mobile app than with App Inventor.


What types of apps work best with App Inventor?


David Wolber: The most exciting apps that App Inventor facilitates are those that take advantage of the technology inside the Android device. In the book we show you how to create social apps that process SMS texts: you can build a 'No Text While Driving' app that automatically responds to texts that come in and speaks them aloud using Android's speech synthesizer. You can also build a 'Broadcast Hub,' an SMS texting app that a group in Helsinki customized for event communication with a group of more than a thousand people. And you can build 'Android Where's My Car?,' an app that remembers a location for you and gives you a map later so you can get back there. These apps are easy to create in App Inventor because there are high-level blocks for all that technology.


App Inventor is also great for creating games and educational software. One of the first apps students in my class build is 'MoleMash,' but they personalize it, so they're mashing a picture of a relative or teacher. Later, they build quiz apps and study guides, which come out great because it's easy to add video and sound.


Which App Inventor-created apps have surprised you?


David Wolber: The app that surprised me most was one a man made to propose to his girlfriend. She's a Harry Potter fan, so he made it seem like a Harry Potter quiz with videos and images he clipped in. She had no idea it was a 'personal' app, until the last question was 'will you marry me?' with their favorite song playing. I liked it because it illustrates a key to App Inventor: you can build apps with very personal utility.


Will App Inventor apps eventually become widely adopted applications?


David Wolber: They haven't yet made it easy to deploy App Inventor apps to the Android Market — you have to jump through some hoops. But this limitation will go away and you'll be able to deploy with a single click.

The potential for building widely adopted apps is definitely there, and the App Inventor team is busy adding more functionality so you can program anything with it that you could do with the Android SDK. They're also working on a 'Component Designer' so programmers, using the SDK, can add new components and blocks to App Inventor. I have no doubt App Inventor will be used to build apps for the Market, and will be a common part of the app building arsenal.


The other interesting development is that an App Inventor gallery is being built, which is sort of an open-source alternative to the Android Market. The gallery will be a place where people upload the apps they've built, including the source code (source blocks). So you'll be able to download apps and if there's something you don't like or want to personalize, you can download the blocks and change it with App Inventor. It will be the world's first 'customizable app store.' App Inventor and the gallery will definitely lead to apps that are widely used.


Android Open, being held October 9-11 in San Francisco, is a big-tent meeting ground for app and game developers, carriers, chip manufacturers, content creators, OEMs, researchers, entrepreneurs, VCs, and business leaders.


Save 20% on registration with the code AN11RAD


Related:


"

Minha lista de blogs