 I've posted before about my intense love for Booting off a VHD (Virtual Hard Disk). It's lovely. Of course, once Hyper-V on the client happens, it will matter less, but for now, here I am, a guy with a perfectly good, working Windows 7 machine who wants to also run the Windows 8 Developer Preview.
I could do a few things to play with Windows 8. I could:
- Try a virtualization solution, but it might not work, I may not have the drivers I need and it won't be as shiny as running "on the metal."
- Sacrifice a machine I have lying around. I'll probably do that at some point, but I'd like to try it out on my actual hardware that I use all day long.
- Swap out my C: drive and use my main machine. I don't have a tool-less case, and I'm also very lazy, so, um, ya.
- Dual boot. Dual booting may feel ninja but it ALWAYS ends on tears. And sometimes blood.
- Boot on real hardware from a Virtual Hard Disk.
Booting off a VHD is my current preferred solution for trying crazy stuff because the only speed hit I'll take is on the virtualized hard drive. Everything else is real hardware. I do this all the time with presentation VHDs and one-off daily builds of stuff.
Warranty
Of course, this is just some dude's blog. I puzzled this out and while booting to VHD is supported, messing with your boot manager - especially with Preview (that means, NOT RELEASE QUALITY) Software is a recipe for losing your job and a messy divorce. There's no warranty, express or implied. If you quake in fear from the following instructions, you need to STOP. It may be the case that you are actually a Non-Technical Friend and you don't realize it. Well, someone just told you. Please don't destroy your hard drive. I don't know you and I don't how how you got here. Stop calling. Jimmy no live here, you no call back!
Booting a Windows 8 VHD off a Windows 7 Primary System
 Whew, now that's out of the way, let's void a few warranties, shall we?
Please note that there are a half dozen ways to do this. You can do it all from the command line using tools like ImageX, DISM, etc, or you can do a lot of it graphically with tools like BellaVista. This is just the way I did it. It's not gospel. I'm sure the folks in the comments will have much nicer ways. Take them all with a nice grain of sea salt. You can also SYSPREP the VHD directly from the ISO's WIM with IMAGEX if you know what that stuff means. It's a little subtle and requires you go get some tools. While my process is a little baroque, it just needs the one ISO->USB tool.
Step 0 - Have a lot of Disk Space
I like to have a roomy VHD. You can make one that expands or you can make a fixed size. 40 gigs is usually enough, but I like 60 gigs as a nice round number, plus this is the Windows 8 Developer Preview with Developer Tools. If you don't have enough space when an expandable disk "bloats" itself to the fixed size on boot, it'll blue screen, so expandable or not, have the slack space.
Step 1 - Make a USB stick or DVD from the ISO
Go get the Windows 7 USB/DVD download tool and get yourself a USB stick that will hold at LEAST 10 gigs. I used a 16 gig one. Go through the process by pointing at the ISO you downloaded and then preparing your USB key. You can also use the resulting USB key to boot and install Windows 8 from your sacrificial hardware if you like.
_3.png)
_3.png)
_3.png)
_3.png)
Step 2 - Make a Virtual Hard Drive
You can do this later in the process by pressing Shift-F10 while in the Setup Tool, but I like to prep things up front. You can do it from the Disk Management GUI or from DISKPART at the Administrator command line.
Be aware that your VHD needs to be on an internal drive or SATA drive. USB won't work as the drivers are initialized too late in the boot process.
Also, if your machine is BitLockered, your VHD needs to be on a non-BitLockered partition and you need to suspend BitLocker during this process. Also, know your recovery key because I don't know it.
2a. Start up an Administrator Console and run DISKPART. Execute the lines after DISKPART> below, changing them for your own system.
C:\Users\Scott\Desktop>diskpart

Microsoft DiskPart version 6.1.7601
Copyright (C) 1999-2008 Microsoft Corporation.
On computer: HEXPOWER7

DISKPART> create vdisk file=d:\VMs\Win8.vhd type=expandable maximum=60000

  100 percent completed

DiskPart successfully created the virtual disk file.

DISKPART> select vdisk file=d:\VMs\Win8.vhd

DiskPart successfully selected the virtual disk file.

DISKPART> attach vdisk

  100 percent completed

DiskPart successfully attached the virtual disk file.

DISKPART> create partition primary

DiskPart succeeded in creating the specified partition.
2b. OR do it from the Disk Management GUI:
_a0d5d934-01f3-4f2e-8abf-329a6c8587db.png)
At this point, you've got a VHD that's empty, but ready to have Windows installed to it. The VHD and your system are NOT ready to be booted from. That will come in a minute.
Step 3 - Boot off the Windows 8 USB Key
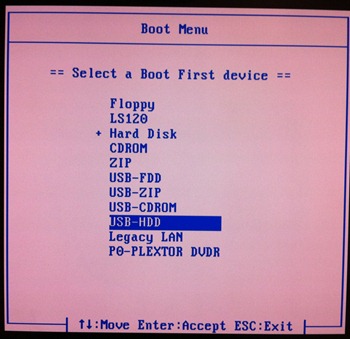
Now, restart your computer with your new USB key plugged in and startup your BOOT MENU. The hotkey is usually F12 to bring it up. You want to boot off the Windows 8 USB key.
Side Note: Folks with Gigabyte Motherboards. These motherboards are notoriously hard to figure out a USB boot. You need to make sure that you USB key is only plugged into the board directly in the back. Then, don't use the Boot Menu, it never works. Instead, enter the BIOS with the DEL key and manually put your USB Key (it'll be detected by brand, so be prepared to recognize the string) at the top of the Hard Drive boot order.
Step 4 - Attach the VHD while still inside SETUP
Pay attention here. Actually, hell, pay attention to the whole thing, it's subtle.
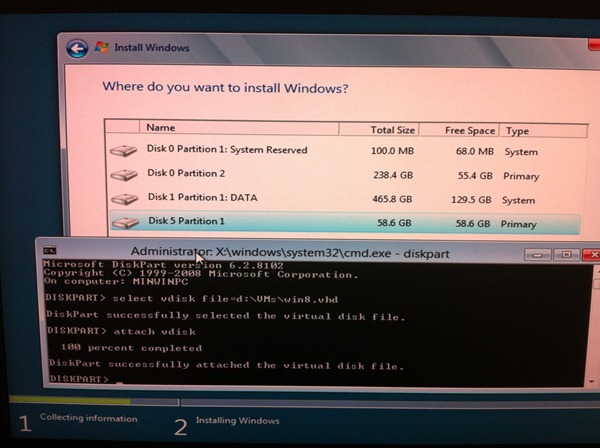
Start the SETUP process, click Install Not but DO NOT PICK A HARD DRIVE. As shown in this screenshot, instead hit SHIFT-F10 to get to a console. We want to attach our VHD and install to THAT instead.
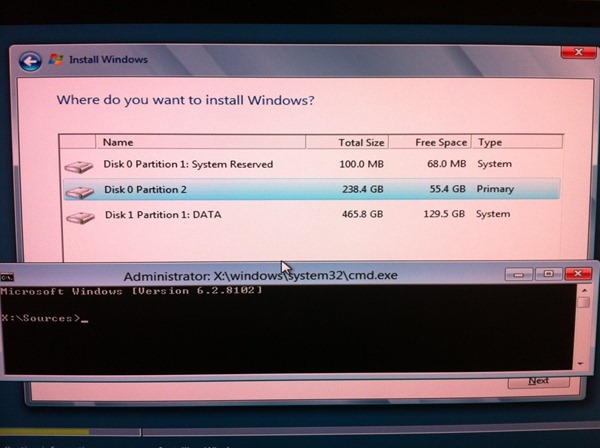
In the screenshot above I haven't touched anything, yet.
Below, I've run DISKPART and selected and attached the VHD with these now familiar commands:
DISKPART> select vdisk file=d:\VMs\Win8.vhd
DISKPART> attach vdisk
That will look like this screenshot.
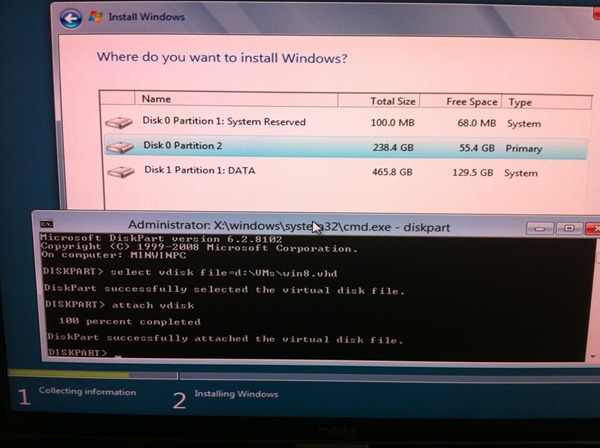
Next, ALT-TAB back over to the list of disks and hit REFRESH. You'll see your VHD show up. Mine is the 60 gig one. That's the blank we are going to install to.
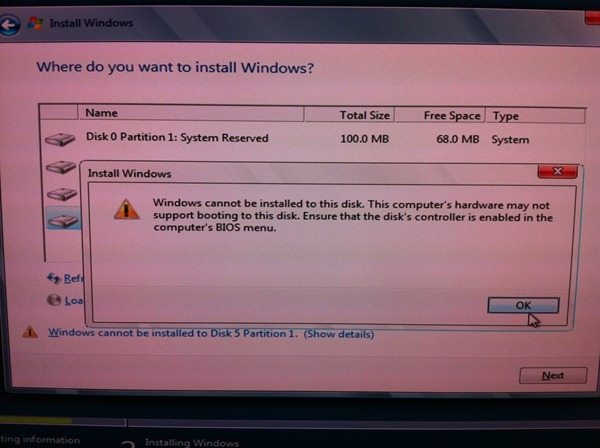
Note that installation will warn you that this VHD can't be booted to. Yet. That's cool, go ahead and install to that empty VHD.
At some point it'll ask you to restart the computer. The setup process isn't done yet, but go ahead and reboot and remove the USB key.
Your system should reboot and setup will continue, this time off the VHD.
NOTE: I had expected at this point to go and manually create a BCD entry using BCDEDIT.EXE from an Administrator command line as I did in my first post on booting to VHD but it seems that is all done for us now!
The Windows 8 Developer Preview build automatically noticed that I was trying to boot off a VHD and added a Windows Bootloader option and put the description in as "Windows Developer Preview," saving me a half dozen tedious steps. I was very pleasantly surprised! I'd like to hear if you had the same experiences, Dear Reader.
I could tell it was working because my C: drive is a totally silent SSD and my D: drive is spinning rust. When the setup continued I could totally hear the hard drive that holds the VHD spinning. The installation completed happily at this point with me having to manually create an entry with BCDEDIT.
I confirmed it with bcdedit.exe /v while running Windows 8 Developer Preview.
Setup completed, and I rebooted again to make sure I could get back into Windows 7.
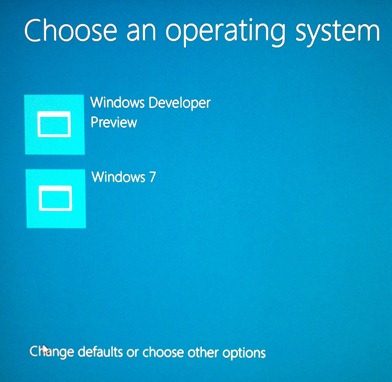
In fact, I was shocked to find a completely new bootloader had come into play. I was literally open-mouthed staring at it. It's not text, it's graphical and friendly! It actually and literally "did the right thing." Awesome.
This seems to be the Windows 8 boot manager that you'll see if Windows 8 Developer Preview is the default. Otherwise you'll see the Windows 7 text-mode one first. Very cool. I hope it stays past the Developer Preview.

Here's what you get if you click Other Options.
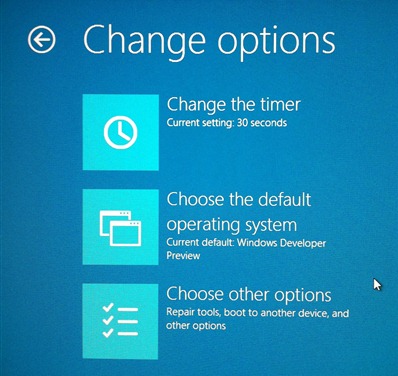
That's it. To recap:
- Make an empty VHD
- Attach to the VHD just before installing Windows 8 Developer Preview
- Install to the VHD
- Rejoice
Hope this works for you, Dear Reader. I'm happily booting Windows 8 Developer Preview to VHD today.
One final disclaimer to be CRYSTAL CLEAR. I puzzled this process out with the same bits given out at http://dev.windows.com. I don't work for the Windows team and I don't know anyone over there. I have no idea if this will work in the future. I only know it worked on my home machine, tonight, once.
Related Links
- Step-By-Step: Turning a Windows 7 DVD or ISO into a Bootable VHD Virtual Machine
- Less Virtual, More Machine - Windows 7 and the magic of Boot to VHD
© 2011 Scott Hanselman. All rights reserved.


Nenhum comentário:
Postar um comentário